Showing posts with label home renovations - kitchen. Show all posts

Saturday, August 28, 2021

Before & After Installing Our New Kitchen Faucet

      I haven't written about our kitchen renovation since 2017. It's been almost four years since my husband and I renovated our kitchen last time, which was painting our kitchen ceiling.


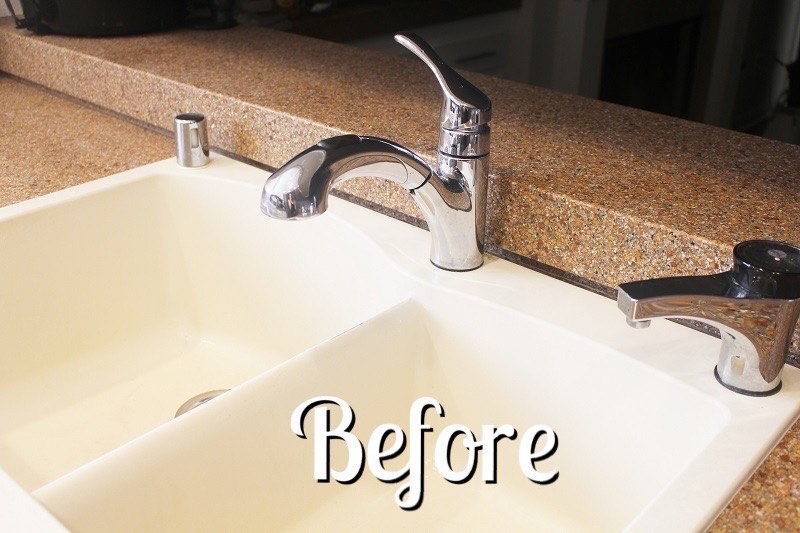
      Last weekend, he finally replaced the kitchen faucet and I really like the new one. As you can see the photo below, the old faucet didn't look too bad, but the new one looks much better to me. 😊


The Old Kitchen Faucet

     The old faucet was the chrome pull-out kitchen faucet with the instant hot water dispenser. The reason why we decided to replace the old kitchen faucet to new one was that it's gradually getting hard to turn the faucet, so it's time to replace it to new one. We also realized that we have never used the instant hot water dispenser since we purchased our home in 2016, so we decided to remove it this time. By doing so, we have a little more space in our kitchen cabinet under the sink now. 


Shopping Kitchen Faucet

Home Depot
     We went to our local Home Depot to purchase a new kitchen faucet. At the store, there were so many faucets we could choose from!
Home Depot


Chrome VS Stainless Steel 

     The old kitchen faucet was chrome, but we looked for stainless steel one this time because our kitchen cabinet t-bar pulls are stainless steel. 

Our kitchen cabinet pulls are stainless steel.


Pull-Out Faucet VS Pull-Down Faucet

       We decided to have pull-down faucet this time because we have enough room above sink. These years, pull-down faucets are more popular because a high neck looks more elegant, and there are more pull-down faucets than pull-out faucets in the market. 

Pull-Down Faucet

   Pull-Down Faucets need more room above a sink and is better for a deep sink. 


Pull-Out Faucet

     Pull-out faucets are a better choice if you don't have enough room above sink. 


Spring Kitchen Faucet?

       These years, spring kitchen faucets have been popular because they have more professional look. I thought that spring kitchen faucets were very stylish, but I like a simple faucet which is easier to clean.   

Spring Kitchen Faucets are popular right now.


Touchless Kitchen Faucet?

     Kitchen Faucets with motion sensor are more expensive but are loved by people who look for hygienic option and love technology. However, I didn't choose a touchless kitchen faucet because I read some reviews that they sometimes soaked themselves unexpectedly. 

Touchless Kitchen Faucet


      We finally purchased this Glacier Bay Mckenna Pull-Down Kitchen Faucet.

Glacier Bay Pull-Down Kitchen Faucet

Glacier Bay Pull-Down Kitchen Faucet


Replacing the Old Faucet to New One


    He finally removed the old faucet and the instant hot water dispenser.

      He installed this Danco Kitchen Sink Hole Cover to cover the hole after removing the instant hot dispenser. It was very easy to install.

Danco Kitchen Sink Hole Cover

Danco Kitchen Sink Hole Cover


The size of water supply lines were larger than the size of faucet hoses.

      When he was installing the new kitchen faucet, he noticed that the size of the water supply lines and the faucet hoses weren't the same, so he needed joint adapters to connect those. He went to Home Depot again and asked a staff which adapters he should choose. He eventually purchased two Everbilt slip joint adapters (3/8 in x 1/2 in). These adapters work perfectly!

Everbilt Slip Joint Adapter
 

Everbilt slip joint adapters work perfectly!


Final Look!

     I really like that the new kitchen faucet rotates smoothly. 👍

    The turbo spray is powerful enough.

     The spout has a button which switches the water from turbo spray to aerated spray.

     The hose is long enough to reach all around the sinks. It's easy to wash large pots.


      I really like our new kitchen faucet. 😊


    These are my entries you might like.
Before and After Wet Bar Renovation - Install Backsplash Tiles, Replace Outlet, Paint Cabinets and Decor

Before and After Door Hardware - From Door Knob to Door Lever

Before & After Painting All Cabinets

How to Install New Outlet Cover Plate - Hubbell Taymac Revive Decorator Wall Plate Review

How to Install A Spring Door Stop

■ Before and After Master Bathroom

Before and After Home Office - 5 Home Office Updates!  


      My entries related to home renovations can be seen here.

      My entries related to kitchen renovations can be seen here.


Monday, September 18, 2017

Finished Kitchen Light Project - Painting Ceiling

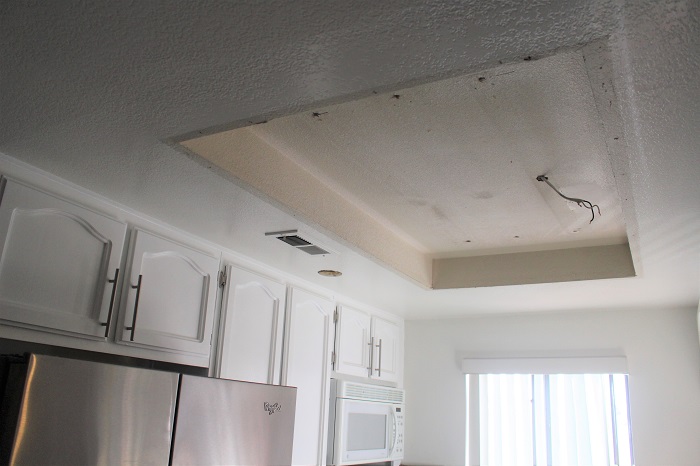
      My husband installed new LED dounwn lights in our kitchen in February this year. He was going to repair the drywall soon, but we were too busy for another renovation project.

      Last month, drywall contractors eventually repaired the ceiling. By the way, we didn't hire them, but our HOA sent them to our home in order to repair other drywall that day, and a head of HOA contractors saw the kitchen ceiling and told us that they would fix it as well. It was a really generous offer! We were very impressed at their professional work! They did it in a few hours. :)


       Then, we painted the ceiling ourselves. Just like the bathroom wall paint we have done, we used Kilz Premium Primer and Olympic One Paint.
KILZ Premium High-Hide Stain Blocking Interior/Exterior Latex Primer/Sealer, White

Olympic One Tintable Semi-gloss Latex Enamel Interior Paint and Primer in One (Gypsum OL133 N32)


      We finally finished our kitchen light project! :)

      The reason why our HOA sent drywall contractors to our home was that we had a problem with a ceiling leak in our living room in January and February because of California's historic winter storms. It heavily rained in Southern California last winter, and our condominium had leaks from the roof. That's why our HOA repaired the roof and fixed the ceiling in our home (It took six months to finish it.). We were going to replace old carpets to new laminate flooring in our entire home, but the HOA contractor recommended us to replace it to vinyl flooring because laminate is not 100% waterproof. That's why we changed our plan. We purchased luxury vinyl planks and now working on flooring project. :) I'll write about it next time. :)  


    These are my entries you might like.
Before and After Wet Bar Renovation - Install Backsplash Tiles, Replace Outlet, Paint Cabinets and Decor

Before and After Door Hardware - From Door Knob to Door Lever

Before & After Painting All Cabinets

How to Install New Outlet Cover Plate - Hubbell Taymac Revive Decorator Wall Plate Review

How to Install A Spring Door Stop

Before and After Kitchen Flooring - Easy and Affordable Peel-And-Stick Vinyl Flooring! 

Built-in Trash Cans - Before and After  


      My entries related to home renovations can be seen here.

      My entries related to kitchen renovations can be seen here.


Sunday, February 19, 2017

My Kitchen Lights - Installed 3500k Downlights

     As I mentioned in my previous entry, my husband removed the dated fluorescent lights in our kitchen early this months.


     Last weekend, he removed the drywall ceiling and installed some wooden supporters.

    Yesterday, he installed the drywall and made holes for recessed lighting.


     Tonight, he finally installed these LED down lights in our kitchen!
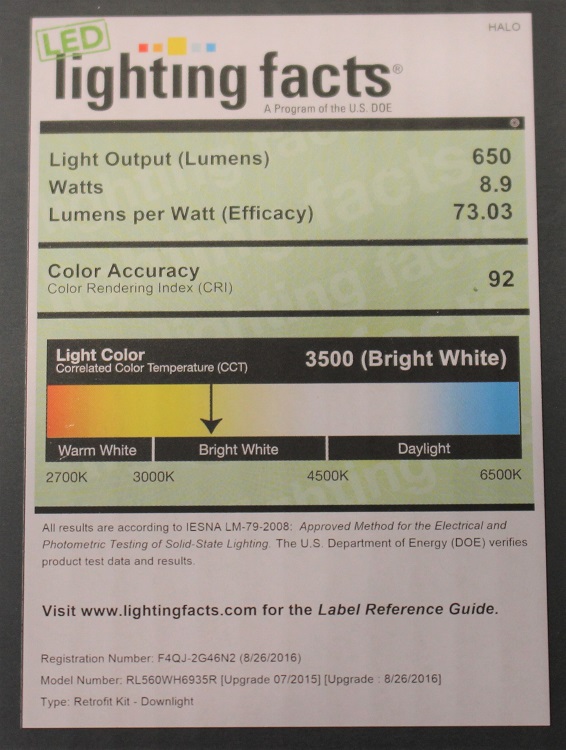
        We first tried three light colors, 2700k, 3000k and 3500k, for our kitchen, and we finally chose 3500k. :) The 2700k was too warm for a kitchen. The 3000k was not too bad, but since I often take photos in our kitchen to post them on my blog, I thought brighter is better for photos, and 3500k is the best for our kitchen. :) 

       Next time, he will repair the drywall. Then, we will paint the ceiling, but we will paint it later since he will replace other ceiling lights in hallways. We want to paint the kitchen and hallway ceiling together. :)   I am really happy that our kitchen is so bright now because we had to cook there without ceiling lights for two weeks! :)


     My entries related to home renovations can be seen here.
http://itisapieceofcake2011.blogspot.com/search/label/home%20renovations


    These are my entries you might like.

Before and After Door Hardware - From Door Knob to Door Lever

Before & After Painting All Cabinets

How to Install New Outlet Cover Plate - Hubbell Taymac Revive Decorator Wall Plate Review

How to Install A Spring Door Stop

Before and After Kitchen Flooring - Easy and Affordable Peel-And-Stick Vinyl Flooring! 

Built-in Trash Cans - Before and After  


Friday, February 10, 2017

My Kitchen Lights

     My husband and I have been renovating our outdated home since we purchased it last summer. When we purchased our home, we thought that the dated kitchen fluorescent lights need to be replaced with new recessed lights someday.
Before 1 (07/11/2016)
         Last year, we painted cabinets, installed new cabinet pulls, installed new flooring and replaced the refrigerator in our kitchen. This year, we have been working on bathroom renovation for two months, and we were going to replaced the kitchen lights after bathroom renovations are done. However, we decided to work on the kitchen light replacement earlier because the old light didn't work properly. The old light took minutes to light after the switch was turned on. :(
Before 2 & After

      He finally removed the kitchen fluorescent lights this week. We were going to find an electrician to have recessed lights installed, but he told me that he probably could do it himself. Now, our kitchen doesn't have any light fixtures! I hope our kitchen get new lights as soon as possible. (It's because it's too dark now!)
Now


     My entries related to home renovations can be seen here.
http://itisapieceofcake2011.blogspot.com/search/label/home%20renovations


    These are my entries you might like.

Before and After Door Hardware - From Door Knob to Door Lever

Before & After Painting All Cabinets

How to Install New Outlet Cover Plate - Hubbell Taymac Revive Decorator Wall Plate Review

How to Install A Spring Door Stop

Before and After Kitchen Flooring - Easy and Affordable Peel-And-Stick Vinyl Flooring! 

Built-in Trash Cans - Before and After


Tuesday, December 20, 2016

Black Friday Haul - Whirlpool Counter-Depth Refrigerator

      When my husband and I purchased our home this summer, we first thought that we should buy a bigger refrigerator soon because we cook meals on a daily basis, and that refrigerator, which was included this home purchase, was smaller than one we used to use at our previous apartment. Moreover, the old 18-cu ft refrigerator was not only small but also looked pretty dated. It has worked without any problem though.

      On the Black Friday, we finally bought a new refrigerator. Since we have a narrow kitchen, we looked for counter-depth refrigerators. As I mentioned in my previous entry, even though we were planning on purchasing one on online, we went to our local Lowe's to see actual refrigerators on the day before Thanksgiving Day.

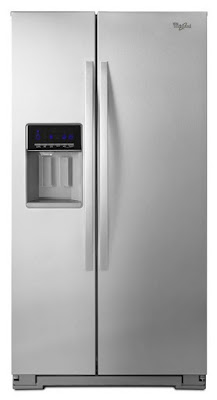
     Finally, we purchased this Whirlpool 20.6-ct ft refrigerator, WRS571CIDM. :) It was originally $1,598 but was on Black Friday Sale for $1,098. After everything (tax, a water filter, a connector and 5-year warranty), it cost $1,078 with using a 10% off coupon, Lowe's gift cards and Topcashback. We purchased a 10% off Lowe's e-coupon from Ebay right before ordering this refrigerator. When Lowe's gift cards were on sale, we purchased some Lowe's gift cards from PayPal Digital Gifts through Ebay and kept them to use our refrigerator purchase. By the way, I don't really recommend purchasing any gift cards from individual Ebay sellers and Raise.com because we don't know who is selling the gift cards, and I never want to purchase fraud gift cards. I think that a few bad people steal credit card information from somewhere and purchase a lot of gift cards and resell those.    
Whirlpool 20.6-cu ft Counter-Depth Refrigerator WRS571CIDM 

      Anyway, my husband and I thought this refrigerator had enough space for us. :) 
Whirlpool 20.6-cu ft Counter-Depth Refrigerator WRS571CIDM

    On December 10, the new refrigerator was finally delivered to our home!

      We were surprised that filtered water and ice cubes from this refrigerator were so delicious somehow. We used to drink water filtered by Brita for many years, but Brita water tasted terrible sometimes. It was seriously life-changing for us! At first, I didn't like that it was told that a refrigerator with ice maker was easy to brake. That's why we also purchased a 5-year warranty for this refrigerator. I hope this one will last at least 5 years. 

    I purchased some white baskets at Daiso to organize in it. This morning, I cooked a lot of chikuzenni and put them in my refrigerator, but I can see it has still some free spaces. :)

     I also purchased two Daiso white containers for frozen meat and vegetable in my freezer, and I am still looking for two more containers. I need two medium size ones for frozen seafood and bread. I am also planning on purchasing an extra shelve in this freezer.

       Overall, I am really satisfied with our new refrigerator. :)

     Our kitchen had a new look with replacing the refrigerator. :)

       The photo below was taken on the day we purchased this home. We were sometimes surprised at how much our kitchen has improved by looking back the first photo. We painted kitchen cabinets white and installed t-bar pulls. Then, we moved the old trash compactor and refrigerator, and installed new kitchen flooring. Then, he made a built-in trash cabinet. Finally, the refrigerator is there. Next project for our kitchen renovation will be installing recessed lights, but it will be done next year. We are now working on our two bathrooms' renovation. :)      
7/11/2016


     My entries related to home renovations can be seen here.
http://itisapieceofcake2011.blogspot.com/search/label/home%20renovations

     These are my entries you might like.
Before and After Kitchen Flooring - Easy and Affordable Peel-And-Stick Vinyl Flooring! 

Built-in Trash Cans - Before and After

Before & After Painting All Cabinets


Wednesday, December 14, 2016

Redone Peel-And-Stick Vinyl Flooring in Our Kitchen

     As I mentioned in my previous entry, my husband and I installed peel-and-stick vinyl flooring in our narrow kitchen in September. At first, we were really happy that our kitchen had modern new look.

       However, later I noticed that some vinyl tiles moved a little. Sadly, the glue on the tiles didn't hold properly. :((  Our kitchen flooring ended up looking terrible.

     Next month, we decided to redo entire kitchen flooring and used this Gorilla Glue. (I know we should have done it sooner but were too busy those days.) I was very surprised that many of the tiles were very easy to take off. It was no wonder that the tiles moved because these didn't stick well at all. We put a tiny amount of Gorilla Glue on each tile this time and waited for 12 hours. This Gorilla Glue worked like a charm. :)  
Original Gorilla Glue

     It's been almost two months since we glued them down with using Gorilla Glue. All tiles stay in the same place now. :)

        Overall, I am happy how our kitchen looks now. Even though these tiles weren't truly peel-and-"STICK" vinyl tiles, these look beautiful and were very affordable. Just we needed extra glue for this project.


       By the way, we purchased a new refrigerator for our kitchen on Black Friday. I'll share it with you next time. :)    


     These are my entries you might like.
Before and After Kitchen Flooring - Easy and Affordable Peel-And-Stick Vinyl Flooring! 

Built-in Trash Cans - Before and After

Before & After Painting All Cabinets

     My entries related to home renovations can be seen here.
http://itisapieceofcake2011.blogspot.com/search/label/home%20renovations