These are my entries related to our bathroom renovation.
■ Before & After Painting All Cabinets (August 2016)
■ Shower Tile and Bathtub Paints (February 2017)
■Before and After Master Bathroom - New Shower Handles, Tub Spout And Shower Heads (March 2017)
■Before and After Master Bathroom (2018)
The bathroom was very outdated and ugly before. Now, this bathroom has clean and brighter look! :) We tried to renovate our bathroom on a budget. Today, I'm going to share with the vanity top, sink, faucet and mirror frame in this bathroom. :)
Replacing Tile Vanity Top
As I mentioned in my previous entry, Replacing the Tile Vanity Top on A Budget - Bathroom Renovation, my husband installed these porcelain tiles which have natural stone look for a bathroom vanity top in our guest bathroom in previous year. We really loved it because it gave the bathroom a modern look, and it's easy to clean. That's why we decided to purchase the Carrara Polished Porcelain Tiles at Floor & Decor again. :)
 |
| Carrara Polished Porcelain Tile |
 |
| Carrara Polished Porcelain Tile |
He installed the Carrara Polished Porcelain Tiles. He used Kobalt 24-in Snap Cutter for cutting a large tiles, and Goldblatt G02009 Compound Tile Nippers and Hitachi G12SR4 6.2-Amp 4-1/2-Inch Angle Grinder for cutting the round shaped hole for a sink.
For its grout, he used Fusion Pro Single Component Grout Bright White.
Bathroom Sink : Kohler K-2699
 |
| Kohler K-2699 |
Bathroom Faucet : American Standard Devonport
 |
| American Standard Devonport |
Bathroom Mirror Frame
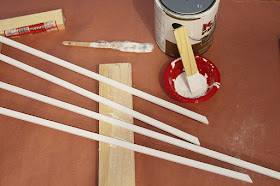
We cut and sanded them well. Then, we painted them white. Because this frame would be for a high humidity bathroom, we used Kilz Premium High-Hide Stain Blocking Latex Primer, which prevent mildew and mold, and Olympic One semi-gloss enamel paint.
 |
| Kilz Premium Hight Hide Stain Blocking Latex Primer |
 |
| Olympic One Tintable Semi-gloss Latex Enamel Interior Paint and Primer in One (Gypsum OL133 N32) |
We installed the frame. He filled the tiny gap with DAP Crack Shot and painted over it for a seamless look. This mirror frame looks so perfect. :) Actually, after building the bathroom mirror frame in our master bathroom, we did it for our guest bathroom as well. ;)
Next time, I'll write about the floor tile in this bathroom.
These are my entries related to our bathroom renovation.
■ Before & After Painting All Cabinets (August 2016)
■ Shower Tile and Bathtub Paints (February 2017)
■Before and After Master Bathroom - New Shower Handles, Tub Spout And Shower Heads (March 2017)
■Before and After Master Bathroom (2018)
■How We Renovated Our Bathroom on A Budget - Tile Vanity Top, Sink, Faucet and Mirror Frame (2018)
■Installing Bathroom Floor Tiles - Our Master Bathroom Renovation (2018)
■Bathroom Renovation - New Toilet, Paint, Towel Bar, Medicine Cabinet and Window Treatment (2018)
These are also my entries you might like.
■New Bathroom Sink, Faucet, Toilet, Towel Bar and Paint - Bathroom Renovation
■Before and After Wet Bar Renovation - Install Backsplash Tiles, Replace Outlet, Paint Cabinets and Decor
■Before and After Home Office - 5 Home Office Updates!
■Before and After Master Bathroom - New Shower Handles, Tub Spout And Shower Heads
■ Shower Tile and Bathtub Paints
■ Before and After Door Hardware - From Door Knob to Door Lever
■ Before & After Painting All Cabinets
■ How to Install New Outlet Cover Plate - Hubbell Taymac Revive Decorator Wall Plate Review
■ How to Install A Spring Door Stop
■ Before and After Kitchen Flooring - Easy and Affordable Peel-And-Stick Vinyl Flooring!
■ Built-in Trash Cans - Before and After
My entries related to home renovations can be seen here.
My entries related to bathroom renovations can be seen here.


No comments:
Post a Comment